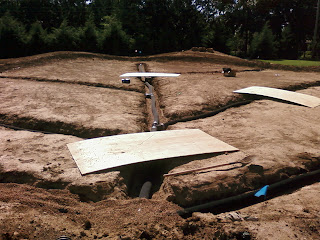
First the grass was scraped away from the site which may not have been necessary but I didn't want that grass rotting under the green. To provide elevation and aiding in drainage about seven truck loads of soil were dumped on the site. That soil was compacted and roughly shaped, resembling
a plateau. Once there was a rough grade, the area that was planned to be the putting surface had to be dug down or cored out so to speak to about an 18 in. depth called the subsurface which has to match the putting surface when completed. This allows for a 4 in. gravel layer and a 12 in. greens mix (root zone) layer which consisted of 85% sand and 15% peat. We chose to use the soil that was cored out for adding mounds around the putting surface.
Now the area that was cored out was filled with the layers of peagravel and greens mix. In the picture below the peagravel is already in place and the greens mix is beeing added. Note there are random stakes marked with measurements for exact layer depth so the subsurface will match the surface. This type of construction meets USGA specs.
The greens mix was compacted and smoothed to a final grade before planting. It's also a must to have a properly working irrigation system in place before planting any grass. Below you will see some photos of the irrigation system installation. I was able to use a system much like a home lawn would have, with zones of multiple sprinklers controlled by a valve for each zone. There are four sprinkler heads that water the green which are seperated into two zones, therefore two heads will run as one zone and the other two heads run with the other zone. The areas around the green were also designed with this same concept but include more heads per zone. Most golf courses can control each head individually by using the valve in head sprinkler which require a bit more pressure to opperate than what I had here. Although these "zone" systems are typically used on golf courses for the smaller areas like tee boxes. If this green had been any wider then a valve in head system would've been installed.
I chose to place all the valves in one location for ease of accessability.
More pictures and descriptions comming soon!
See construction overview continued.


No comments:
Post a Comment